Being Prepared

It’s the motto of the Scouts and is nothing new, most people are usually prepared to some degree, whether it be as simple as carrying a jack in the boot of your car or saving into a pension fund, or paying insurance, by taking these actions doesn’t mean you hope for a flat tyre or accident! or are in any hurry to reach retirement! But nevertheless we take these actions as insurance against what could happen. Prepping in the true sense of the word is no different except that people with this mindset or lifestyle are tending to expand this into many more aspects of life.

I have heard many people’s versions of why they live a preparedness lifestyle ranging from the very basic to the extremely unusual, for me the reasons are totally scalable, and it’s a logical assessment of the likelihood of something happening and the potential severity of the disaster and its impact upon me personally, what you then find is that the way you prepare for one thing generally covers you for a multitude of other scenarios.
So firstly I break these down into two levels of likelihood of occurrence.
Level 1 (Likely) – These are things that regularly occur or may have occurred several times in my lifetime.
Personal Disasters Job Loss, Redundancy, death of a loved one
Weather – Bad Winters, Blizzards, Ice Storms, hot Summers, fire, excessive rain, flooding, Storms, electric out, trees down
Local Disasters – Localised Water or Air Contamination, Riots, bomb scare.
Economic – Recession, Stock market crash, Housing market crash, Interest Rate increase,

Level 2 (what’s possible) – Things that could possibly occur.
• Global pandemic
• Electromagnetic pulse (or other variations with the same effect)
• Meteor or comet strike
• Global Economic collapse
• Invasion or war or world war

Secondly I consider the severity level of how this affects me and my family.
Personal – This is a directly impact on me or my family, e.g. Job loss, a house fire, death or health emergency
Immediate area – At home, work or my commute, e.g. evacuation, Gas leak, flooding, power cut, vehicle break down or accident, weather change, storms
Town – local area to my location, e.g. Riots, mass blackout, or civil unrest, chemical spill, water or air pollution
County – Wider spread issue of above, Weather issues, and power plant explosions.
Country – Severer weather & climatic issues, economic collapse, pandemics or civil unrest.
Global – Global economic collapse, pandemics, meteor strike, or volcano eruption.

By protecting yourself in the first instance on a personal level as much as possible, so food, water, shelter, insurance, maintain good health, multiple sources of income, self-reliance, little to no debt, whilst remaining legal, will cover you for most of the likely events (Level 1). This means being prepared on a daily basis, for example every day carry; car kits; black out kits; food and water storage; learning of skills
The remaining, more unlikely issues, are more difficult to completely prepare for, however by preparing for Level 1 you will automatically have better chance of surviving them.

next time ….. I will go through aspects of my preps and how I cover off these potential disasters.

Posted in Preparedness | Tagged , , , , | Leave a comment

The Bee Diaries – The Hive Build

Having purchased my first batch of equipment discussed in ” A start to the Bee keeping venture”, one of my first tasks is to build the hive, this isn’t always required, but I took the lower cost option of buying my hive flat packed, this and purchasing from the trade show has saved over £100 which is about 40% of the retail cost.

IMG-20150420-00034

The Meshed Base

The base of the hive comes pretty much intact, this is an open mesh floor and has a sliding tray that catches the debris from the hive and allows you to inspect for Varroa mites. The open mesh on this type of hive also provides ventilation whilst maintaining security.

The base also has the main entrance to the hive in the form of a small slot.

IMG-20150420-00035Step one was to build the larger Brood chamber, this is where the colony will hopefully thrive and grow, it’s where the Queen will live and lay her eggs and is the most important part of the hive. IMG-20150420-00036One of the key aspects of building any of the chambers is to orient the sloping base side rails outermost so any rain can run off the box.

This chamber sits directly onto the floor, there is no glue or fastenings that hold the sets of the hive together other than the natural propolis that the bees will provide to fill in any of the gaps. We will look into Propolis at a later date.

IMG-20150420-00039The next layer of the hive is the Queen excluder, I have gone for a plastic one. The function of this is as the name suggests, to exclude the Queen, basically the chambers above are going to be purely honey stores and you need to keep the queen out otherwise she would just lay more brood in these areas. I chose plastic over metal purely to reduce the chance of a burr on the press metal type that can gradually wear down the bees as they pass through.

IMG-20150420-00040Onto this sits the first super, this is much shallower than the brood box but functionally works the same way. I have made two of these, this allows redundancy and will allow my colony to grow into these areas if required.

IMG-20150420-00042The crown board comes assembled, it has two elongated slots in it that allow feeders to be placed over them during winter months and they are also used to insert porter bee escapes which are one way doors effectively for clearing the bees before harvesting. I forgot to buy these but they are not required just yet anyway!

IMG-20150420-00043Finally the roof, I almost messed this bit up as it was getting late and I got tired! but its all good in the end. IMG-20150420-00045The key points are the ventilation points, on the outside of two of  the panels there are grooves, these are IMG-20150420-00046
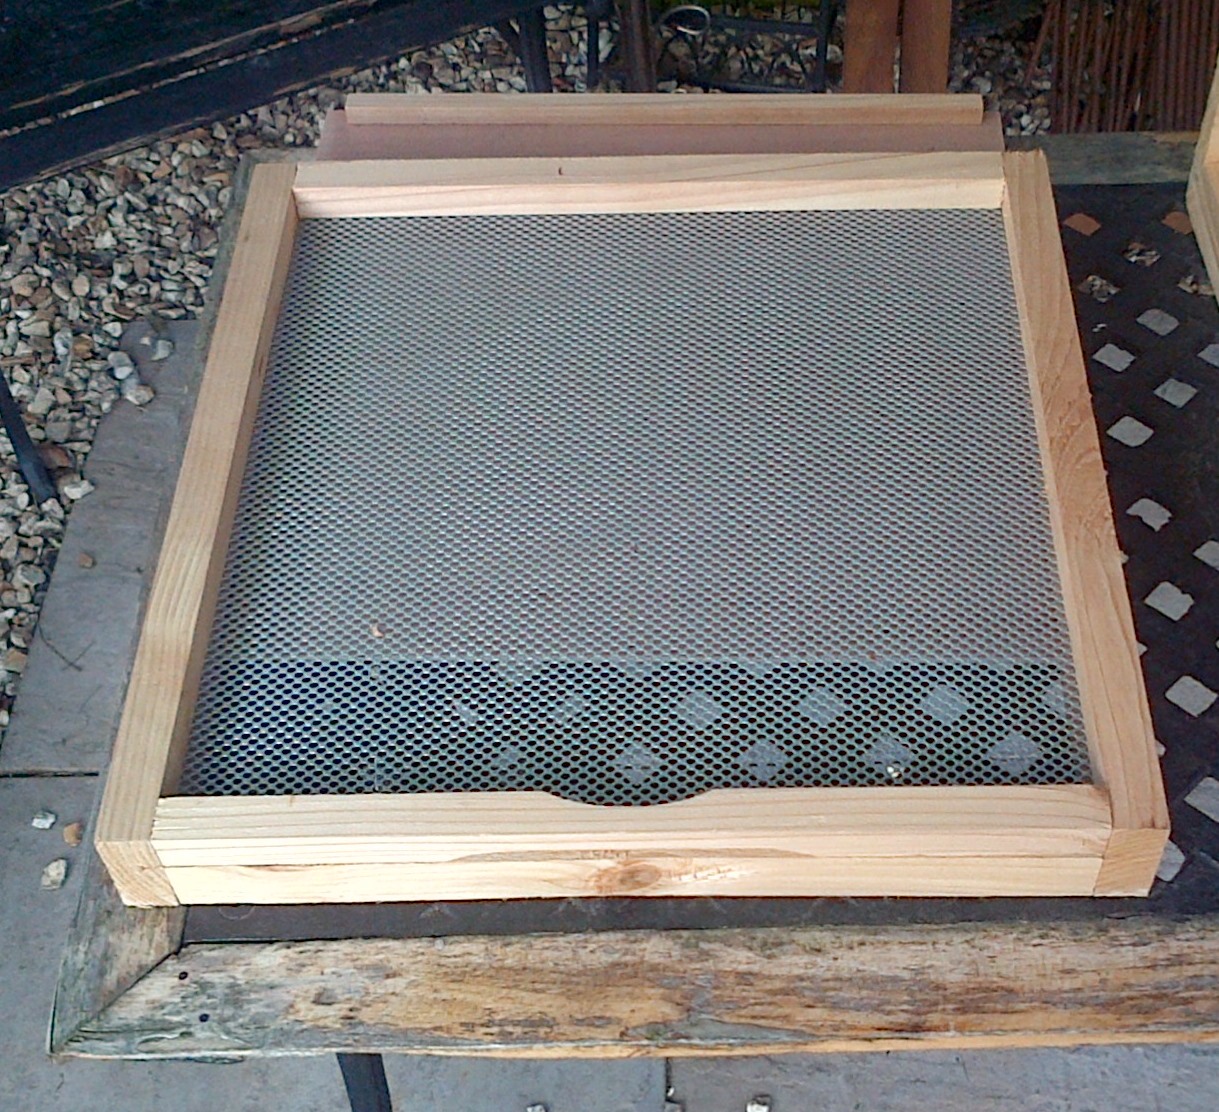
outer facing and align with the corresponding mesh of the lid

IMG-20150420-00037I also made up a few frames for the brood box, I chose the wired wax foundation to maintain strength.IMG-20150420-00038

These are DN1 top bars, the narrow spacing onto which I will place plastic spacers to allow deeper wax cells to be created.

For diagrams of this project I used the downloadable PDFs from Maisemore shown in the link http://www.bees-online.co.uk/downloads.asp

Next Time…… I will take a look at the other starter tools, placing my Hive and the preparation to receive my nucleus of Bees.. thanks for reading.

Posted in Bee Keeping | Tagged , , , , , , , , , , , , , , | 4 Comments

The Bee Diaries – A start to the Bee keeping venture

The idea of bee keeping for me is a new one, it wasn’t something that I had ever considered before, The idea behind wanting to do it stems from my increasing years and prepper interests, by this I mean, looking towards another small income as I reach retirement years and to assist another part of self reliance goals.
Although I’m only 49 at present I see this hobby as a 2 to 5 year plan to become proficient enough to be able to start increasing my Bee colonies to the point that they will pay for themselves and give surplus for sale.

Last month I attended a weekend Bee keeping taster course at NSBKA, a very well run course. The Spring convention is at Harper Adams Agricultural College this weekend so I had planned to go along yesterday and acquire the basic tools and equipment at trade prices.

image

I went with a National hive having considered everything including the more natural top bar hive. It also made some sense as my first nucleus of bees that with be ready in early June are coming in a small nucleus box with National size frames.
Stay tuned for my progress! coming up next…The Hive Build

Posted in Bee Keeping | Tagged , , , , | 4 Comments

Wildlife Tracking with Black Bear Bushcraft

The weather was more than ideal on the 7th March 2015 at Highnam Woods on the outskirts of Gloucester, temperatures of around 14oC, dry and sunny with light winds. The weather up to this point had been wet so soft ground made it an ideal first time tracking environment. The group consisted of six people, including myself and my wife, Daniel Days of Black Bear Bushcraft, met us at a good location and led us to the secure parking at the entrance to the woods. The day commenced with introductions and an overview of the day’s events [08/03/15, www.blackbearbushcraft.co.uk]

  • The difference between Tracking and Trailing
  • Successful stalking techniques
  • Camouflage and concealment
  • Components of a track (footprints)
  • Following a trial
  • Feeding sign
  • Droppings and scat
  • Nest, sets, beds and burrows
  • Species recognition from tracks
  • Reading the speed of movement
  • Reading the size of the animal.

In the words of Black Bear Bushcraft, “being able to find and recognise animal tracks and sign is, to most of us involved in bushcraft, an excellent skill to have. Although its origins of practice are linked to the hunter, it really does broaden the enjoyment of being out amongst nature when you can gather the evidence which tells you the story of what’s been happening around you”. “As well as the UK, Dan has spent time learning to track animals in Norway, India, Sweden, and the African sub-continent, and has been fortunate enough to have learned from some of the best trackers in the world. In his own right, Dan is a level 2 Track and Sign specialist, as awarded by international conservation organisation CyberTracker “Highnam woods is an official RSPB reserve, it is an ancient, 200 acre, broadleaf woodland home to many species of British woodland mammals, and in relatively large number providing a bounty of tracks, signs and trails by which to identify them and to help unravel their actions and behaviour”. Some of the very basic understandings of tracking were explained during the initial 1 ½ hours of introduction in the superb bird hide that doubled as our sheltered training room, for example the difference between dog and fox trails, in that a dog tends to meander whereas a fox would be in a straight line, and that a kill sites surrounded by a round circle of feathers would be by a Bird of prey, whereas a foxes kill site would look more random. Whilst to the expert tracker, this simple, logical information makes understanding the visual data so much easier for the novice. With lots of notes taken down, that were later to become basic knowledge to build onto, Dan produced a collection of 3D printed animal skulls and proceeded to explain the differences. The image shows the visual differences between each, from top to bottom these are:IMG-20150307-00004.jpg

  • Mouse, Rat, Hedgehog, Squirrel, Rabbit, Tawny Owl, Badger & Fox (apologies if I got that wrong!).

What was interesting was the differences between the similar sized Badger and Fox skulls, the Badger have the clearly visible Cranial ‘Fin’ and fixed lower Jaw. Within minutes of moving out onto the trail Dan was pointing out indentations in the mud that previously I would have not even noticed.11050745_10153131249938252_2964177117585439332_n With the explanation of the ‘negative space’ of tracks you start to build up a visual picture of the animals foot, whether it’s the left or right, front or rear and direction that it was heading. IMG-20150307-00016.jpgprintThe  image shows one our first finds being a badger, the fresh soft mud telling us that this was probably from the night before. A trick explained was observing the colouration of the imprint, a solid colour would identify an old track where time had balanced out the drying of the prints surface, that compared to a fresh print that would tend to be varying colours of dryness level, demonstrated by pressing of your thumb into the ground adjacent the track. I found the experience a bit like putting on a new pair of glasses and suddenly everything starts to look more clear, its took a little while to adjust to what it was I was trying to see, but once you do see, its very difficult not to notice tracks everywhere you look!IMG-20150307-00017.jpg IMG-20150307-00020.jpgThe trail ahead is then a lot clearer and you can start to identify and follow the direction of travel. Learning to sizing the animal and determining the approximate stickpace by creating a tracking stick aids measuring and finding prints. It was also interesting to see other signs of animal presence such as scratching’s, dens, scat, proof of browsing, feeding, etc. IMG-20150307-00023.jpg den scat browsing2 feed Witnessing a good example of a Nut Hatch’s activity on a tree. IMG-20150307-00043.jpg nut hatch Birch polypore fungus used as a plaster or as a knife strop. IMG-20150307-00052.jpgIMG-20150307-00051.jpgBirch polypore fungus knife strop It grows horizontally out of the side of the Birch tree. To Identify, it exclusively fruits on birch trees in semi-circular or kidney-shaped form. In-rolled caps ranging from white to tan, and from 2.5cm to 25cm in width cramp ball 1cramp ball 2cramp ball 3Another useful fungus found was ‘coal fungus’ or ‘cramp balls’ or ‘King Alfred’s cakes’ found on dead parts of Ash tree, these black blobs are hard, semi-spherical black lumps around 3-4 cm in diameter. With a few strokes of the Ferrocerium Fire Steel Rod, this fungus is quickly turned into a self-burning coal, this combined with the papery birch bark makes the birch tree a very useful resource for fire-starting. After following a few trails and learning the procedure of closing of trails we took position at a known badger set and settled in and rested up, a quiet time to reflect on the day’s events as the sun slowly started to drop below the tree tops and the presence of dusk started to show. IMG-20150307-00057.jpgOur hope of the badgers putting in an appearance wasn’t to be and previous monitoring had established that they tend to come out around 6 and 7pm. All in all a fantastic full day of learning, I always find that there is something very spiritual about being among the trees and nature; it clears your mind of everyday stresses and makes you sleep a whole lot easier! For more information speak to Dan at Black Bear Bushcrafthttp://blackbearbushcraft.co.uk/courses/wildlife-tracking-course.html

Posted in Tracking | Leave a comment

Navigation

Just started to read Lyle Brotherton’s Ultimate Navigation Manual – about 20% through at the moment and its looking to becoming a bit of a navigation bible.

The Book

Posted in Navigation | Leave a comment